Redhat9 + Nginx + PHP-FPM + MariaDB + phpMyAdmin + FTP でPHP8.2 の実行環境を構築する。
今回構築していく OS の環境を確認する
$ cat /etc/redhat-release
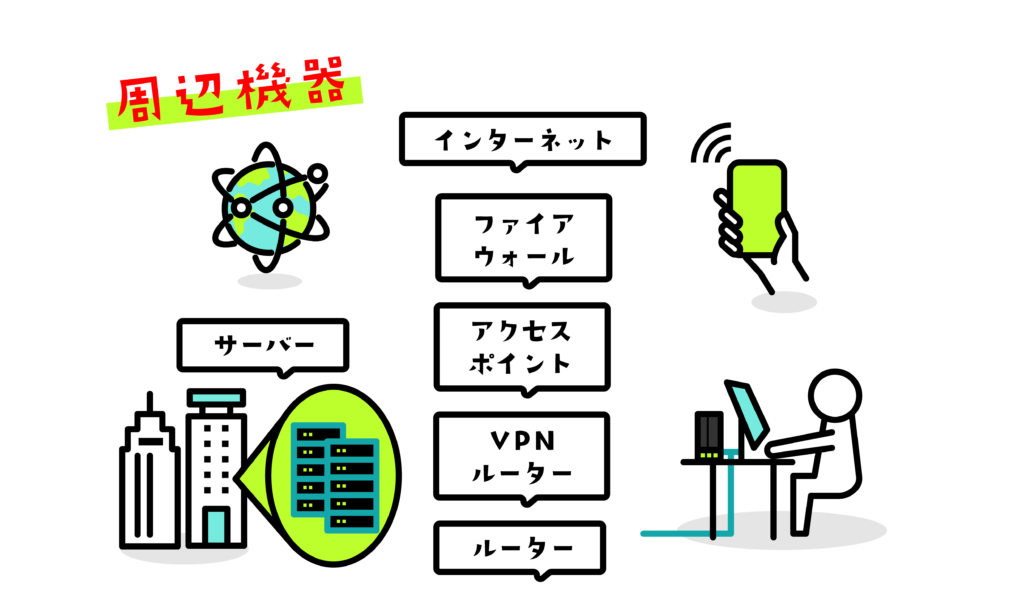
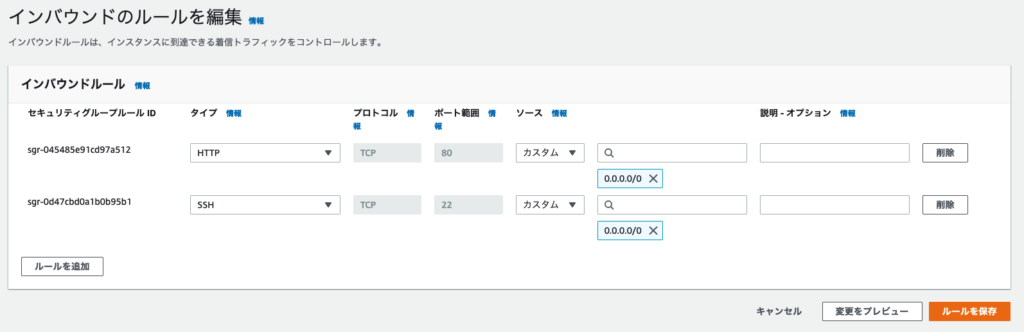
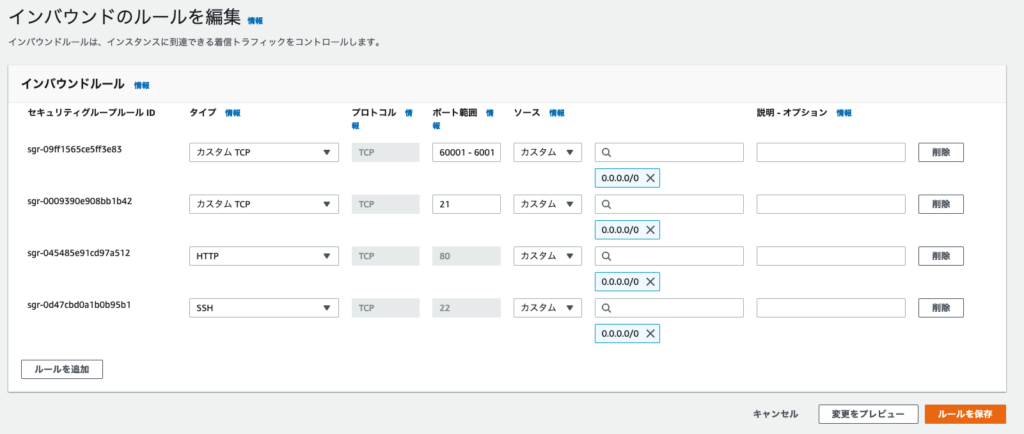
Red Hat Enterprise Linux release 9.3 (Plow)サーバーのポートを開放する(AWS)
SELinuxを無効に設定する
一時的に無効化するには、以下のコマンドを実行します。
$ sudo setenforce 0永続的に無効化するには「 /etc/selinux/config 」を変更します。
$ sudo vi /etc/selinux/config

# 「enforcing」になっている箇所をコメントアウトして「disabled」を追加
# SELINUX=enforcing
SELINUX=disabled
OSの最新化を行う
タイムゾーンを変更します。
$ sudo timedatectl set-timezone Asia/Tokyo
$ sudo timedatectl status
Local time: Thu 2023-02-16 08:30:51 JST
Universal time: Wed 2023-02-15 23:30:51 UTC
RTC time: Wed 2023-02-15 23:30:51
Time zone: Asia/Tokyo (JST, +0900)
System clock synchronized: yes
NTP service: active
以下のコマンドを実行します。
$ sudo dnf update定期更新を自動化する
EPELリポジトリに含まれるパッケージなので、EPELをインストールします。
$ sudo dnf install https://dl.fedoraproject.org/pub/epel/epel-release-latest-9.noarch.rpmRocky Linux 9 の場合は下記コマンドを実行します。
$ sudo dnf install epel-releasesubscription-manager を無効化して、dnf-automaticをインストールします。
$ sudo vi /etc/yum/pluginconf.d/subscription-manager.conf
[main]
enabled=0

# When following option is set to 1, then all repositories defined outside redhat.repo will be disabled
# every time subscription-manager plugin is triggered by dnf or yum
disable_system_repos=0

$ sudo dnf install dnf-automatic
自動アップデートをスケジュールします。
$ sudo systemctl enable --now dnf-automatic.timer
$ sudo vi /etc/dnf/automatic.conf

[commands]
# What kind of upgrade to perform:
# default                            = all available upgrades
# security                           = only the security upgrades
upgrade_type = default

# Whether updates should be downloaded when they are available, by
# dnf-automatic.timer. notifyonly.timer, download.timer and
# install.timer override this setting.
download_updates = yes

# Whether updates should be applied when they are available, by
# dnf-automatic.timer. notifyonly.timer, download.timer and
# install.timer override this setting.
apply_updates = yes

# 毎日4時に自動更新する
[Timer]
OnCalendar=*-*-* 4:00
デーモンのリロードをします。
$ sudo systemctl daemon-reloadスケジュールの一覧を確認します。
$ sudo systemctl list-timers

NEXT                        LEFT      LAST  PASSED  UNIT                  ACTIVATES
Fri 2023-02-17 06:14:22 JST 15h left  n/a   n/a     dnf-automatic.timer   dnf-automatic.service
PHPをインストールする
OSデフォルトのPHP(5.4系など)がインストールされていないことを確認します。
$ sudo dnf list installed | grep phpもし、インストール対象外のPHPが出力された場合は削除をします。
$ sudo dnf remove php*PHP 8.2をインストールします。
Remiパッケージを使用する方法もありますが、今回は標準インストールを使用します。
$ sudo dnf module enable php:8.2
$ sudo dnf install php php-fpm php-mysqlnd
PHP のバージョンを確認します。
$ php -v
PHP 8.1.8 (cli) (built: Jul  5 2022 21:55:55) (NTS gcc x86_64)
Copyright (c) The PHP Group
Zend Engine v4.1.8, Copyright (c) Zend Technologies
    with Zend OPcache v8.1.8, Copyright (c), by Zend Technologies
php.ini のタイムゾーンを変更します。
$ sudo vi /etc/php.ini

[Date]
; Defines the default timezone used by the date functions
; https://php.net/date.timezone
;date.timezone =
date.timezone = "Asia/Tokyo"
タイムゾーンの変更を確認します。
$ php -i | grep timezone
Default timezone => Asia/Tokyo
date.timezone => Asia/Tokyo => Asia/Tokyo
PHP-FPMの自動起動を設定します。
$ sudo systemctl enable php-fpmPHP-FPMを起動します。
PHP-FPMの起動、停止、再起動、ステータスの確認コマンドは以下を使用します。
$ sudo systemctl start php-fpm
$ sudo systemctl stop php-fpm
$ sudo systemctl restart php-fpm
$ sudo systemctl status php-fpm
Nginxをインストールする
Apacheをアンインストールします。
$ sudo dnf remove httpdNginxをインストールします。
$ sudo dnf install nginx
$ nginx -v
nginx version: nginx/1.20.1
PHPを使用できるようにconfを編集します。
$ sudo vi /etc/nginx/nginx.conf

server {
    listen 80;
    server_name  _;
    root /var/www/html;
    index index.php index.html;

    location ~ \.php$ {
        root           /var/www;
        fastcgi_pass   unix:/run/php-fpm/www.sock;
        fastcgi_index  index.php;
        fastcgi_param  SCRIPT_FILENAME  $document_root/$fastcgi_script_name;
        include        fastcgi_params;
    }
}
PHP-FPMの設定をします。
$ sudo vi /etc/php-fpm.d/www.conf

; RPM: apache user chosen to provide access to the same directories as httpd
user = nginx # nginx にする
; RPM: Keep a group allowed to write in log dir.
group = nginx  # nginx にする

<省略>
; Note: This value is mandatory.
listen = /run/php-fpm/www.sock

<省略>
listen.owner = nginx  # nginx にする
listen.group = nginx  # nginx にする
Nginxの自動起動を設定します。
$ sudo systemctl enable nginxNginxを起動します。
Nginxの起動、停止、再起動、ステータスの確認コマンドは以下を使用します。
$ sudo systemctl start nginx
$ sudo systemctl stop nginx
$ sudo systemctl restart nginx
$ sudo systemctl status nginx
Nginx+PHPの動作確認を行う
動作確認用のPHPファイルを作成します。
$ sudo vi /var/www/html/phpinfo.php

<?php phpinfo(); ?>
ブラウザで開いて確認をします。
403 Forbidden と表示されたとき
ディレクトリのパーミッションが正しいか確認してください。
パーミッションを正しく設定するには以下を実行します。
$ sudo chmod 775 -R /var/www/htmlSSL認証( Let’s Encrypt )のインストール&自動更新を設定する
証明書のインストール準備を行います。
$ sudo dnf install certbot python3-certbot-nginxドメインを指定して証明書をインストールします。
$ sudo certbot --nginx -d [ドメイン] --register-unsafely-without-email証明書の自動更新の設定をします。
更新時にはWebサーバーを再読み込みします。
$ sudo systemctl enable --now certbot-renew.timer
$ sudo systemctl start certbot-renew.timer
$ sudo vi /etc/sysconfig/certbot

PRE_HOOK=""
POST_HOOK="-post-hook 'systemctl reload nginx.service'"

$ sudo systemctl daemon-reload
MariaDBをインストールする
MariaDB(MySQLでも可)をインストールします。
$ sudo dnf install mariadb-server自動起動を設定します。
$ sudo systemctl enable mariadbmariadb-secure-installation を使って MariaDB の初期設定を行います。
$ sudo mariadb-secure-installation

(中略…)
Enter current password for root (enter for none):(そのままENTER)
OK, successfully used password, moving on...

(中略…)
Switch to unix_socket authentication [Y/n] n
 ... skipping.

You already have your root account protected, so you can safely answer 'n'.

Change the root password? [Y/n] y
New password: (rootパスワードを入力)
Re-enter new password: (rootパスワードを入力)
Password updated successfully!
Reloading privilege tables..
 ... Success!

(中略…)
Remove anonymous users? [Y/n] y
 ... Success!

(中略…)
Disallow root login remotely? [Y/n] y
 ... Success!

(中略…)
Remove test database and access to it? [Y/n] y
 - Dropping test database...
 ... Success!
 - Removing privileges on test database...
 ... Success!

(中略…)
Reload privilege tables now? [Y/n] y
 ... Success!

Cleaning up...

All done!  If you've completed all of the above steps, your MariaDB
installation should now be secure.

Thanks for using MariaDB!
MariaDB(MySQLでも可)を起動します。
$ sudo systemctl start mariadb
$ sudo systemctl stop php-fpm
$ sudo systemctl restart php-fpm
$ sudo systemctl status php-fpm
phpMyAdminをインストールする
phpMyAdminをインストールします。
$ sudo dnf --enablerepo=epel install phpMyAdminphpMyAdminが起動していることをブラウザで確認します。
http://(IPアドレス or 接続ドメイン)/phpMyAdmin/
FTPサーバーをインストールする
FTPでログインするユーザーを追加します。
$ sudo useradd -d /var/www/html -s /sbin/nologin ftp-user
$ sudo passwd ftp-user
Changing password for user ftp-user.
New password:
Retype new password:
passwd: all authentication tokens updated successfully.
ユーザーグループを追加します。
$ sudo usermod -G nginx nginx
$ sudo usermod -G nginx ftp-user
/sbin/nologin 指定によるユーザ作成をすると、
Redhat 7 以上だとFTP接続時に「530 Login incorrect.」で失敗してしまいます。
$ sudo vi /etc/shells

# 下記を追記
/sbin/nologin
セキュアFTPパッケージをインストールします。
$ sudo dnf install vsftpdvsftpd の初期設定をします。
$ sudo cp /etc/vsftpd/vsftpd.conf /etc/vsftpd/vsftpd.conf.org
$ sudo vi /etc/vsftpd/vsftpd.conf

# 匿名ユーザーのログイン不可
anonymous_enable=NO

# FTPでログインできるユーザーを制限
userlist_enable=YES
userlist_deny=NO
userlist_file=/etc/vsftpd/user_list

# アクセスファイル(/etc/hosts.allow, /etc/hosts.deny)をアクセス制御に利用
tcp_wrappers=NO

# パッシブモードの接続を許可
pasv_enable=YES
pasv_min_port=60001
pasv_max_port=60010

# ファイル(またはディレクトリ)のタイムスタンプの表示をローカルタイムで表示
use_localtime=YES

# ドットから始まるファイルを含めた一覧を表示
force_dot_files=YES

# ログインディレクトリの指定
local_root=/var/www/

# ホームディレクトリより上層へのアクセスを禁止するかどうかを指定
chroot_local_user=YES
chroot_list_enable=NO
user_listにFTP接続を許可するユーザーのみを追加します。
$ sudo vi /etc/vsftpd/user_list

# vsftpd userlist
# If userlist_deny=NO, only allow users in this file
# If userlist_deny=YES (default), never allow users in this file, and
# do not even prompt for a password.
# Note that the default vsftpd pam config also checks /etc/vsftpd/ftpusers
# for users that are denied.
# root
# bin
# daemon
# adm
# lp
# sync
# shutdown
# halt
# mail
# news
# uucp
# operator
# games
# nobody
ftp-user
vsftpdの自動起動を設定します。
$ sudo systemctl enable vsftpdvsftpdを起動します。
vsftpdの起動、停止、再起動、ステータスの確認コマンドは以下を使用します。
$ sudo systemctl start vsftpd
$ sudo systemctl stop vsftpd
$ sudo systemctl restart vsftpd
$ sudo systemctl status vsftpd
サーバーのポートを開放する(AWS)
関連記事

猫でも簡単!ExcelVBAテンプレート
Page Contents そのまま使える Excel VBA ツールのテンプレートを紹介します。 このテンプレートでできることを紹介します。 ① プログラムの処理高速化(おまじない) ② Windows のダイアログで […]

Excelの関数を利用した万年カレンダー
Page Contents Excel の関数を利用した万年カレンダーです。 ファイルのダウンロードは、こちらから。 Excel の関数を利用した万年カレンダーです。 年と月を入力すると、カレンダーが作成されます。 サン […]

実在する警察署の電話番号が表示される詐欺電話が急増中…(おれおれ詐欺に遭わないために気をつけること)
インターネット上では、国際電話の番号を使う手口(末尾0110)がよく紹介されていますが、昨今急増しているのは実在する警察署の電話番号(都道府県警、警視庁など)が通話アプリで電話番号と警察署の名前が表示されるものです。 目 […]